 CharaFold
Why does an AI character’s face keep changing?
A reference image shows one view under one set of conditions. It may leave the side profile, rear hairstyle or clothing construction unseen. A new angle or exaggerated expression asks an image model to infer more of the design. The useful question is which visible identity cue changed, rather than whether a prompt contained the word “consistent.”
Lighting, perspective and framing can also make a correct feature look different. Compare the shape before you change the design. This guide is a visual review workflow, not a claim that a particular prompt or product eliminates drift.
Find the part that drifted.
| What changed? | What to check | What to try |
|---|---|---|
| The side view looks like another person | Compare the forehead, nose profile, jaw and eye placement against the source. A front portrait does not show the entire profile. | Use a clearer reference if you have one. Request a focused profile correction; do not describe a new face. |
| The outfit changes between views | Check layers, sleeve length, collar, pockets, footwear and recurring accessories. | Write a short fixed outfit description. Decide hidden rear details before judging the back view. |
| The face changes with emotion | Compare facial structure separately from an open mouth, raised brows or a different head angle. | Use a clear identity portrait and a smaller expression change first. Correct the specific feature that moved. |
| The character gets taller or wider | Check whether framing or perspective changed before calling it a body redesign. | Place views at a comparable scale in a blank turnaround layout. Review build and limb proportions; do not stretch an image to conceal anatomy differences. |
| The back view invents details | Look for a bag, seams, logos, hair length or accessories that the original never showed. | Clarify the missing design in words or add a rear reference if the editor supports it. Mark unknown details as undecided. |
A practical workflow for consistent AI characters
- Pick one identity anchor. Use the clearest image of the intended design. Keep it beside later results. Replacing the reference with a drifting output can carry the unwanted change forward.
- Write a small fixed-detail brief. Note the face shape, hair, visible distinctive marks, clothing layers and accessories that matter. Separate these from things you want to change, such as angle or expression.
- Make the smallest useful set. Review body angles for silhouette and outfit, or portraits for emotion. Do not pay to regenerate a full set when your actual task only needs one part.
- Compare at a similar scale. Align the overview enough to judge head size, height and framing. Use the blank turnaround or expression template to organize your accepted images.
- Correct one issue at a time. Keep the accepted images, identify one drifting feature and request a focused edit. Review the new image against the original reference before replacing anything.
Worked example: what to check in Mara’s set
Mara’s studio sample gives you a concrete review exercise. The intended visual cues include short copper curls, freckles, an olive overshirt, a white T-shirt and rust trousers. A face crop alone cannot confirm the full outfit, so review the body views separately from the expressions.
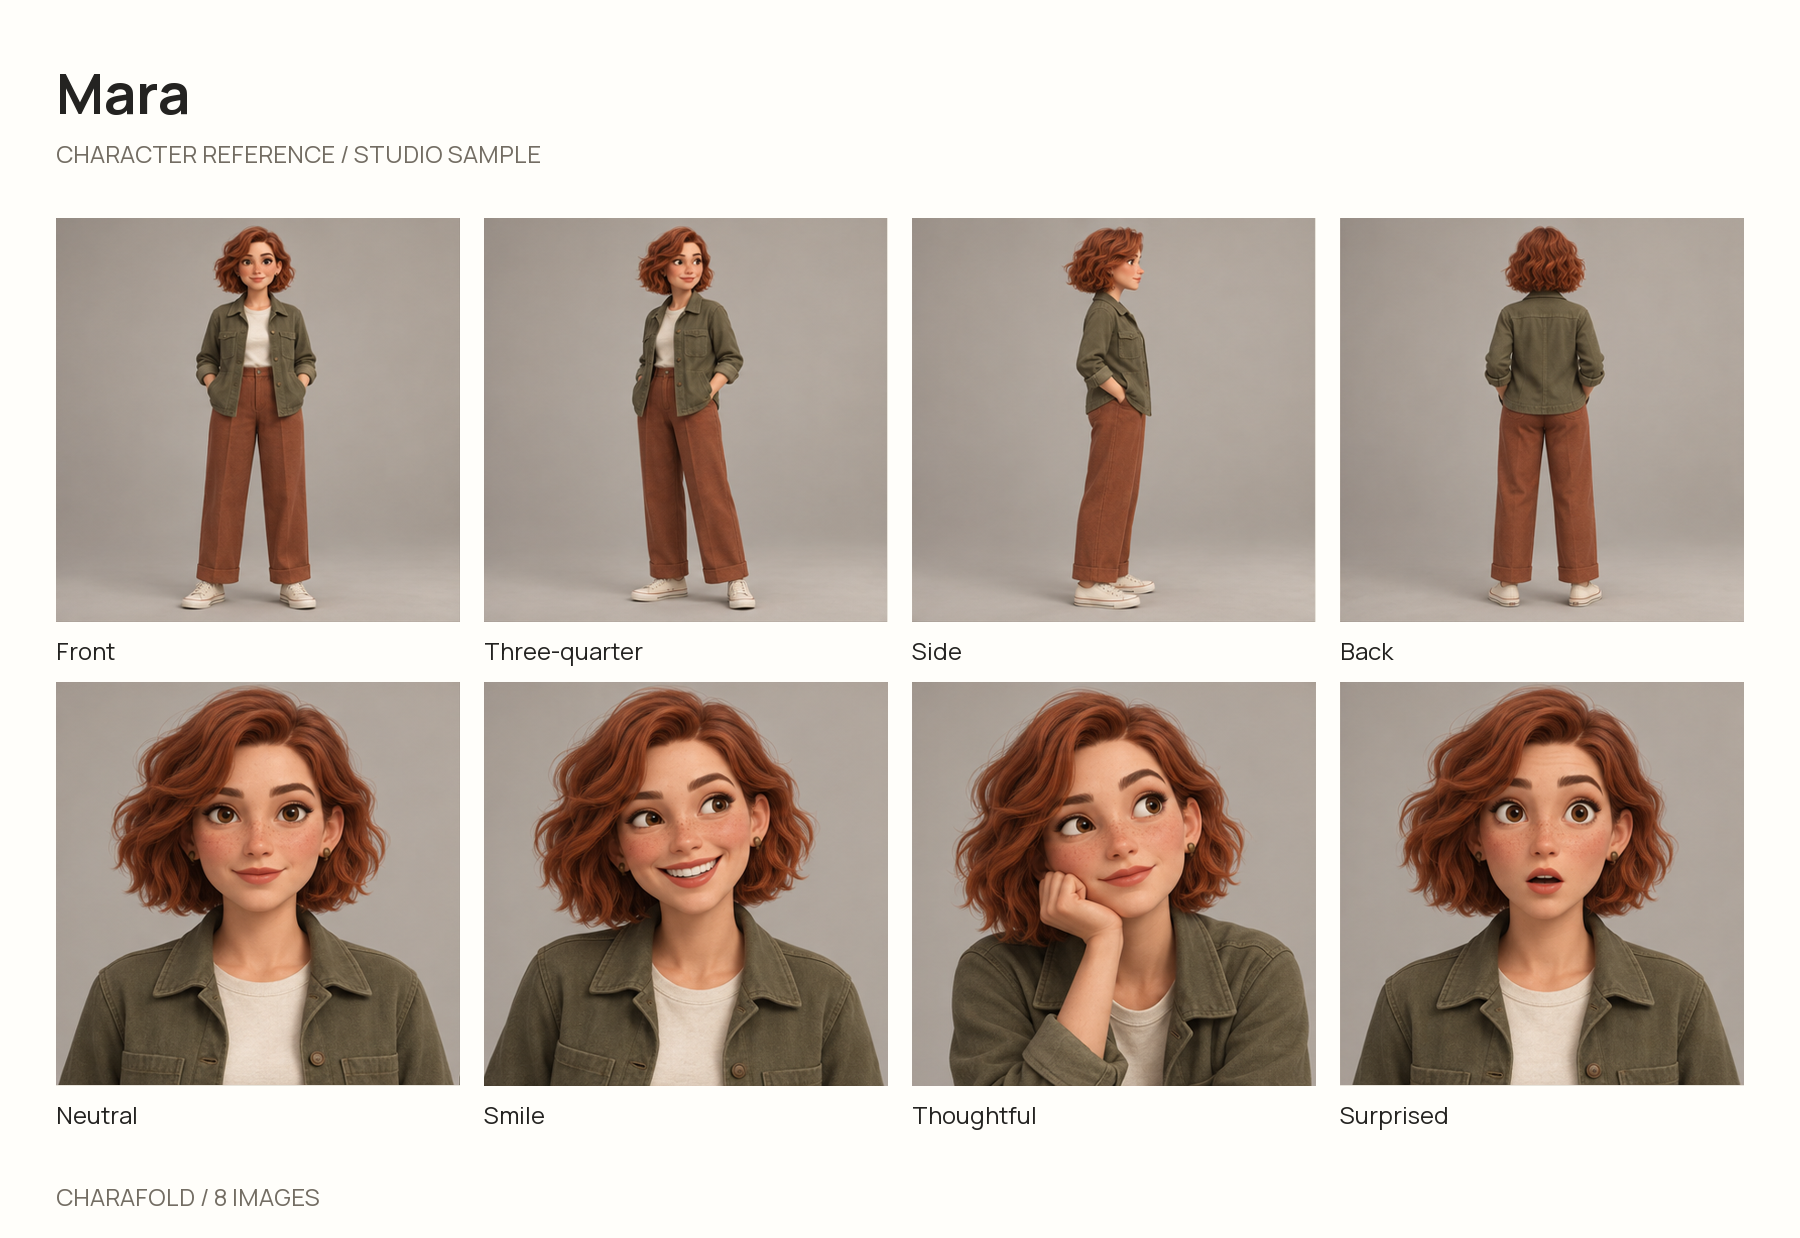
- In the body row, compare jacket length, cuffs, trouser shape, shoes and the hair silhouette.
- In the portrait row, compare freckles, eye spacing, nose and jaw separately from the expression.
- For the back, decide what is part of the design and what the source image did not establish.
The sample reference page lets you inspect individual views at a larger size.
What should a correction prompt say?
Name the one feature, the reference it should match and the parts that should stay untouched. For example: “Match the hair length to the original reference; preserve this side angle, pose, outfit and framing.” Avoid broad requests to “make it better” when you can identify a specific mismatch.
Use the single-detail correction prompt or build a fixed-detail brief with the free prompt builder. In CharaFold, the written instructions are optional; keep them short when your image already communicates the intended design.
When a reference sheet is not enough
A sheet helps communicate a design, but it cannot guarantee the next generator will follow it. Image editors differ in how they use references. AI-generated body views can disagree on perspective or measurements, so an artist should reconcile the geometry before 3D modeling or animation production.
For a useful handoff, keep the approved images and unresolved questions together. Start with the complete reference sheet workflow, use the turnaround option for body views, or focus on the expression sheet option for faces.